

This section provides information about XR650 programming options using a keypad or Dealer Admin, as well as the panel's operating capabilities.
This product incorporates field-programmable software. Refer to the XR650 Compliance Guide for additional compliance information.
Before You Begin
Before programming the panel, ensure it is properly grounded, and AC and battery power are applied to the appropriate panel terminals. Refer to Install the Panel for all wiring connections and grounding instructions.
Note: The panel contains all of its programming information in an onboard processor and does not require an external programmer.
Programming Overview
Programming at the Keypad
Internal Programmer
The panel stores all programming information in its onboard processor and does not require an external programmer. Programming tasks can be completed using a hardwired 32-character DMP alphanumeric keypad set to address 1.
Reset Timeout
The XR650 has a feature that requires you to enter the programming menu within 30 minutes of resetting the panel. After 30 minutes, if you attempt to enter 6653 (PROG), the keypad displays RESET PANEL.
Keypads
Use a 32-character hardwired or wireless keypad to complete panel programming. Programming cannot be accessed using an Icon Series keypad.
Special Keys
The following special keys or areas are common to all DMP keypads:
|
Key |
Description |
|---|---|
|
CMD (Command) |
Pressing CMD allows you to go forward through the programming menu and through each step of a programming section. As you program, the keypad display shows any current programming already stored in the panel memory. If no change is required for an option, press CMD to advance to the next step. You should also press CMD after entering information into the panel’s memory. |
|
Back Arrow |
Use the Back Arrow to back up one step while programming. Press the Back Arrow once to erase the last character entered. |
|
Select Keys or Areas |
The top row of keys are called the select keys on Thinline and Aqualite Keypads or select areas on Graphic Touchscreen Keypads. During programming, you can change current information in the panel memory by pressing the appropriate select key or area under or on the display. When there are more than 4 options available, press CMD to display the next 1-4 options. Pressing the Back Arrow key allows you to review the previous four choices. Press any select key or area when the programming section you want to enter displays. |
Standard Keyboard
Note: Not all keypad prompts accept letters and/or symbols.
-
Press ABC to access uppercase letters.
-
Press abc to access lowercase letters.
-
Press !@# to access symbols.
-
Press 123 to access the Standard DMP Keypad.
Use the Number Pad
-
Choose a character from the table.
-
Identify the Number the character correlates with and press it on the keypad.
-
Identify the Select Key or Area for that character and press that select key or area on the keypad.
-
To access the lowercase letter, press that select key or area again.
-
When the desired character displays on the keypad, continue to enter more characters or press CMD when you are finished.
|
Numbers |
Select Key or Area |
|||
|---|---|---|---|---|
|
1 |
2 |
3 |
4 |
|
|
1 |
A |
B |
C |
( [ { |
|
2 |
D |
E |
F |
) ] } |
|
3 |
G |
H |
I |
! ^ ~ |
|
4 |
J |
K |
L |
? “ | |
|
5 |
M |
N |
O |
/ \ ` |
|
6 |
P |
Q |
R |
& $ |
|
7 |
S |
T |
U |
@ % |
|
8 |
V |
W |
X |
, = |
|
9 |
Y |
Z |
space , : |
_ ; |
|
0 |
|
. ' |
# > |
# > |
Access the User Menu
The User Menu provides access to user and system functions from the keypad, such as managing user codes and groups, creating Z-Wave favorites, and other features.
The XR650 ships with a unique four-digit default master code to access the User Menu for the first time. The code can be modified or deleted. To revert the default code to 99, go to Clear Codes in the Initialization menu in panel programming.
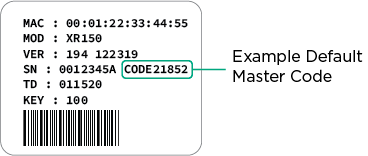
Complete the following steps to access the user menu.
-
Press CMD until MENU? NO YES displays.
-
Select YES.
-
When ENTER CODE displays, enter your user code.
-
Use CMD to scroll through the available User Menu options.
Refer to the XR650 User Guide for more information.
Programming in Dealer Admin
Dealer Admin organizes XR650 programming into sections based on the panel's configuration and features. Select a programming section to view and edit its available options.
When you make changes, Dealer Admin displays the current programming values and available options for each setting. Review the existing values before making changes, and save your changes as you move through the programming process.
Prerequisites
To program an XR650 in Dealer Admin, you need the following:
-
An internet connection
-
An active Dealer Admin account
-
The XR650 added to the appropriate account in Dealer Admin
-
A communication path between the panel and Dealer Admin
Refer to Add a System in the Dealer Admin Help File for more information.
Begin a Programming Session
Program at the Keypad
Access the Programmer Menu
-
Set the reset jumper across the two RESET pins for two seconds.
-
Remove the reset jumper and place it over one pin for future use.
-
Enter 6653 (PROG) at the keypad. PROGRAMMER displays.
Note: If NO AUTHORITY displays after entering 6653 (PROG), ensure SERVICE USER is set to YES in the User Menu.
Program a Lockout Code
Although the XR650 allows you to access the programming menu without a lockout code, it is recommended you program one to restrict programming access to authorized individuals only.
-
Enter 6653 (PROG) at the keypad. PROGRAMMER displays.
-
Press CMD until SET LOCKOUT CODE is displays, then press any select key or area to enter the menu.
-
At ENTER CODE: -, enter a 1- to 5-digit programmer lockout code. Press CMD.
-
ENTER AGAIN displays. Enter the same lockout code again and press CMD. CODE CHANGED displays. It is now required for the new code number to be e entered before accessing the programming menu.
Note: Write down and keep the lockdown code in a secure place with access to authorized persons only. If you lose or forget the lockout code, you are required to send the panel back to the factory to be reset.
Program in Dealer Admin
Before you begin, log in to Dealer Admin.
Update Panel Firmware
-
Go to Customers, then select the System Name.
-
In the menu, go to System Remote Update.
-
Select Update System if there are updates available.
Refer to the Dealer Admin Help File for more information.
Enter the Programming Menu
-
Go to Customers, then select the System Name.
-
Go to Programming, then select the programming menu you want to make changes to.
Note: Changes made in Dealer Admin are not sent to the panel until you send the appropiate programming changes. When you are finished, select Send All Changes to send all pending programming changes to the panel, or select Send [Programming Option] to only send the changes for that programming menu.